Wednesday, January 30, 2013

Wishing you

 
 Dimensions 5.50 by 4.25
 Cut pattern paper at 5.25 by 4.00
Cut a strip of light brown   paper at  2.00 by 4.00
Paper crimped the brown  paper
Cartridge used was Platin School book to cut oval at 1.50 and layer
Stamped saying in oval
Can cut area for saying to go on
Cut shape for saying at 1.25 and layer
Used liquid pearls on flowers and on saying
Ribbon and bow added

Monday, January 28, 2013

Happy Anniversay

 Dimensions 5.50 by 4.25
Embossed white   card stock
Cut white  cat 5.25 by 4.00
Platin School Book  Cartridge
Cut square fours of them at  1.50
Pattern paper cut at 1.00
Stamped in center of card
Added glitter glue on pattern paper
 

Sunday, January 27, 2013

Thanks

Dimensions 5.50 by 4.25
Cut yellow card stock at  3.00 by  4.25
Embossed yellow card stock
Cut pattern  paper at  2.50 by 4.25
 Ran ribbon between colors of paper
Used Walk in My garden cartridge to cut flower
Flower cut at 1.50
Cut  flower out six times and inked edges
Added glitter glue on flowers
Lacey Labels cartridge used to cut shape
Shape cut  in white  card stock at 2.00 and layers
Glitter added to black layer
Stamped Thanks on shape and put on card

Friday, January 25, 2013

Good Times

Dimensions 5.50 by 4.25
Pattern paper 5.25 by 4.00
 Strip on crimped card stock cut 2 inches wide by 4.00 long
Cartridge used Plantin School book
Cut one star at 2.00 and layer to match
Cut second star at 1.95 and layer to match
Cut third star at 1.65 and layer to match
Pop up dots behind stars
Cut white card stock at 2.00
Cut pattern paper at 1.85
Cut saying out of paper at 1.65
Glitter glue added

Thursday, January 24, 2013

Hope Card

 Dimensions 5.50 by 4.25
Black card stock cut  at 5.25 by 4.00
Cut  two strips of white card stock  paper 1. 25  by 3.75
Cut another white card stock strip at  1.50 by 3.75
 Cartridge used for ovals   Platinim  School book
 One oval cut at 2.50  in black card  stock
One oval cut at 2,25 in white card  stock
Embossed white oval
Embossed two strips of white card stock
White center strip left plain
Stamped on center strip of paper
Glitter glue for dots


Card Sizes and Mats Sizes

Card Sizes

Here are the most commonly used standard card sizes at Little Harbor Press. All dimensions shown are in inches.

A1 - 3.5" x 4.875"

The A1 size is most often used in fold-over style for thank you notes and in flat style for wedding response cards. If you like to write shorter thank you notes this is the right size for you, but if you tend to write a lot, you may want to opt for the larger A2 size.

A2 - 4.25" x 5.5"

The A2 size is the most commonly used size for a wide range of cards from invitations to announcements. As a fold-over style note card, the A2 gives you a little more room to write than the A1.

A6 - 4.5" x 6.25"

The A6 size is a little less common than its smaller or larger brothers, but it's a great in-between size for flat cards.

A7 - 5" x 7"

The A7 is a larger and more formal size for your most important events like holiday cards and wedding invitations. It has a substantial feel and gives you the most area for large photographs.

Biz (Business) - 2" x 3.5"

This is the size of a standard business card, and is used for calling cards and wedding table placecards.

Square - 5.5" x 5.5"

The square card is another large, substantial card and has a unique look all its own. Be aware that extra postage is required by the USPS for square envelopes!

Swing Card


SWING Card Video Tutorial

Hi ladies... today we are going to learn how to make the SWING CARD.
Supplies:
paper cutter with cutter and scoring blade
cardstock
Misc. craps for decorating the card with accents and trims
Patterned paper if used can also be double sided so your inside and outside are finished.

We are also using Lucy's Card Sketch for October .. using your imagination and creativity.. we will apply the sketch to a swing card.


Here is the SWING CARD Video Tutorial.


Print the instructions to help you make the swing card after you have viewed the Video.


Here is a card previously made with the centre swing as a square.
 From My Sketch World blogspot.com

Saturday, January 19, 2013

Cuttlbug Smoosh Experiment

Cuttlebug 'Smoosh' Experiment


There has been so much talk just lately about that elusive "Cuttlebug Smoosh" technique that was in a recent Technique Junkies newsletter. Provo Craft even addressed questions about it on their blog. Since I don't subscribe to the newsletter and have only seen samples made using this technique, I decided to do a little bit of an experiment to see what I could come up with on my own.

All of my experimenting was done on plain white cardstock. When inking the embossing folders I used dye ink, which easily rinses out with water.


Experiment #1:

Here is what I used...Snowflake Cuttlebug embossing folder, make-up sponge, and a VersaMagic re-inker.


After I ran my white cardstock through my Cuttlebug, I simply applied the VersaMagic ink directly to the paper with a make-up sponge. Just keep applying ink until you reach your desired color.


Here is the finished product. I added more ink to darken up some areas just to make it look more interesting.


Conclusion: The paper from this first one turned out very pretty, but it does not resemble the 'Smoosh' technique.


Experiment #2:

Here is what I used...A brayer, the Swirls Cuttlebug embossing folder, and a Fruitcake Kaleidacolor ink pad.

I started by brayering the ink directly onto the embossing folder. Notice that I am doing it on the side of the folder that has the Cuttlebug name printed on it. Once fully inked, I put the white cardstock in, and ran it through the Cuttlbug.


This is what it looks like when it comes out. The ink does not get down into the detail, which is what ends up raised. As you can see, it is still white.
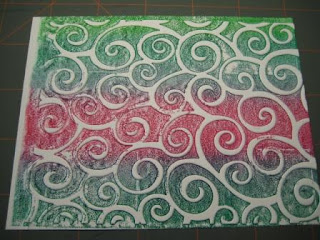
To color what was left white I just ran my brayer over the paper directly. For this one I didn't even re-ink it, there was still plenty of ink on my brayer and I didn't want it to be darker than the background.


Conclusion: This one looks really close, to me. I have noticed in some of the samples I have seen online that they seem to be done with two colors of ink. This particular way would allow for that because you could ink your embossing folder with one color, then brayer over the top with a different color. That could be very pretty!
Possible Option: Instead of brayering the ink onto the embossing folder, you could try to sponge the ink on and try to get it down into all of the grooves. Sponging the ink will probably take longer though, and your coverage is more likely to be uneven.


Experiment #3: I used the same supplies for this one as I did in #2. The Swirls Cuttlebug embossing folder, a brayer, and a Fruitcake Kaleidacolor ink pad.

For this one I ran my white cardstock through the Cuttlebug.

Instead of inking the embossing folder, I used my brayer and went over the cardstock after it was embossed. To hit the raised pattern and the background, you really have to push down. Use two hands if you have to, that is what I did.
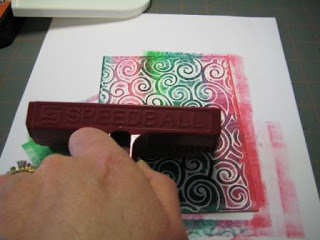
When you are done, your cardstock will look like this. Notice the white areas. Because the paper was already embossed your brayer will not touch all of the background leaving those white lines around the detail, which I think is a really neat effect.
Conclusion: This one looks really good too. The result is definitely much darker since you are repeatedly going over the paper. One nice thing about this method is that there is a little less clean-up, since you don't ink the embossing folder. Plus, you don't have to worry about staining your folder if that is a possible concern.

In the end: The last two methods that I tried are definitely the closest. Are either of them completely right? I have no idea, but they have to be awfully close. The important thing though, is that I had a lot of fun playing and even if it isn't exact, I have 3 new ways to make interesting and beautiful backgrounds!
 From Stampalicious.com

Friday, January 18, 2013

Handy Man Birthday Card

Dimensions  5.50 by 4.25
Cut back ground  card stock at 5.25 by 4.00
Cut another  card stock at 2.00 by 4.00
Used paper crimped to crimp paper
Used Handy Man cartridge to cut out shapes
Cut all shapes at 1.3/4 and all layers
Inked the edges of cream card stock and inked part of paper
Cut  two squares at 2.00 by 2.00
Stamped on cream card stock Happy Birthday

Happy Birthday

Dimensions 5.50 by 4.25
Cut another card stock at 5.25 by 4.00
Embossed the card stock
Cut strip of pattern paper cut 2.00 by 4.00
Ribbon bow added to card
Hat pin added
Button added
Holidays Cake cartridge used to make shape
Cut all layers
Stamped saying on cream card stock

Thursday, January 17, 2013

Happy Birthday Mans Card

Dimensions by 5.50 by 4.25
Cream cut was cut at 3.00 with Ap Cartridge
Embossed the cream card stock and inked edges
Used Billionaire cartridge to cut vest 
Vest was cut at 3.00 with all layers
Used liquid pearls for buttons
Marker to add  lines on tie
Stamped saying on gray card stock

Make a Wish

Dimension  5.50 by 4.25
Used Billionaire cartridge used
Hat and all layers at 2.00
Glasses cut at 1.00 and layers
Mustaches cut at 1.00 with all layers
Eyes added
Stamped saying on card stock
Cut white card stock at 5.25 by 4.00

Hello

 Dimensions 5.50 by 4.25
 Cut four  strips of  colored paper at 3.00 by 2.00
Cut mustache at 1.00 with layers
Used Billionaire cartridge for cuts
 Stamped Hello on card stock

Wednesday, January 16, 2013

Love and Hearts Card


Dimension 5.50 by 4.25
Embossed back ground
Cut strip of paper at 2.00 by 4.25
Stamped saying on strip of card stock
Ribbon bow
Sweetheart cartridge used to cut hearts out
Sizes of hearts 2.00,1.50 and 1.00 
Hearts from cartridge cut out a group at one time
Red hearts cut at 2.00
Cream hearts cut at 1.50
 Purple hearts cut at 1.00
All layers used to make cuts

Saturday, January 12, 2013

 I love being able to use my tools in different ways,so I pulled out my bug and embossing folders  and stamp pads. I got to work playing with them to see what I could come up with.Image
 I first inked the de embossed side image of the folder with a lighter colored distressed inks. I carefully placed paper  in my bug and embossed again.

Then taking the same folder again, and using my Bayer, I inked the EMBOSSED image side (the detailed tiny flowers and vines) with a darker shade of ink. I carefully put my already embossed piece of paper in the folder ensuring the embossed flowers were face up.
I put it through my machine again.
Here's the furnished card.