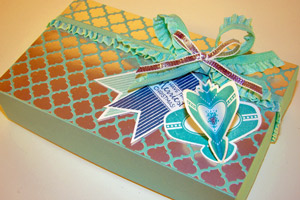
Wednesday, November 27, 2013

Gift Card Box

Gift Card Box

by Brenda Quintana


Create a box to hold a gift card and a sweet treat.

Supplies

  • Cardstock
  • Scoring Tool
  • Scissors
  • Sticky Strip™ , or other strong adhesive
  • Decorative Punch, Stampin' Up!'s Decorative Label Punch used here
  • Embellishments
  • Stamps, optional

Step-by-Step

  1. Step 1

    To make the box, start with a piece of 9" x 7" piece of cardstock (Stampin' Up!'s Coastal Cabana used here). On the 9" side, score at the 1", 4", 5" and 8".
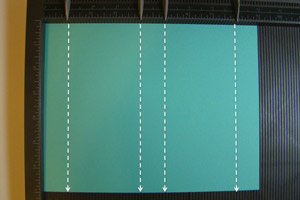
  2. Step 2

    On the 7" side, score at the 1" and 6".
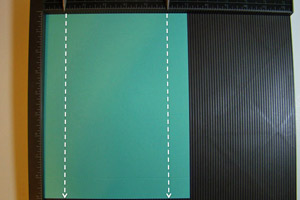
  3. Step 3

    Cut along the score lines in the eight places shown by the yellow highlights. Cut just until the score lines intersect.
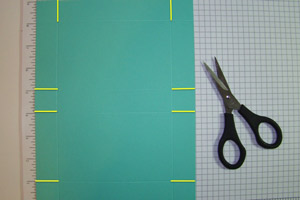
  4. Step 4

    Place two strips of Sticky Strip on each of the six tabs.
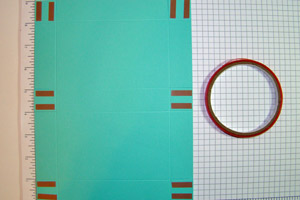
  5. Step 5

    Flip the card stock over and fold inward along all the score lines.
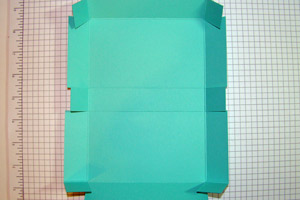
  6. Step 6

    Remove the Sticky Strip liner and bring the tabs together to form a box with an attached lid.
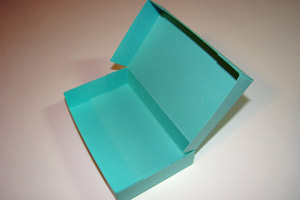
  7. Step 7

    To make the gift card insert, start with a piece of 7" x 5" cardstock (Silver Foil Cardstock used here). On the 7" side, score at the 2 1/4", 3 1/2" and 4 3/4" marks.
  8. Step 8

    Fold the cardstock in half along the middle score line. Punch a hole in the folded center with the Decorative Label Punch.

    Note:
    The punch should only go half way in along the fold.
  9. Step 9

    To make the gift card slot, flip the cardstock over to work on the back side. Draw a pencil line across the short width of the cardstock at the 3 3/4" mark (see blue line). Then make a mark along the pencil line 3/4" in from each side (see red dots).
  10. Step 10

    Cut a slot on both sides of the punched space just until you reach the pencil marks from the previous step (see yellow lines).

    Note:
    To make the slot wide enough for a gift card, make a cut on either side of the pencil line and then nip off the little strip of card stock that remains.
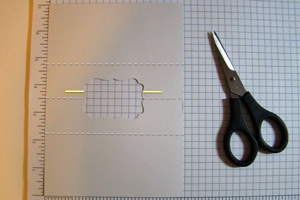
  11. Step 11

    Place a line of Sticky Strip along each of the short ends of the insert piece.
  12. Step 12

    Fold the insert piece along the remaining score lines. Remove the Sticky Strip liner and attach the insert to the inside of the box. Make sure the side with the slot faces up.
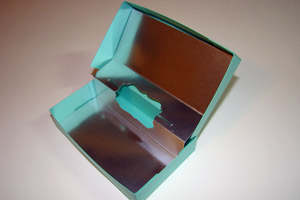
  13. Step 13

    This box has a small space near the front (approx 1" x 1" x 5"), to put some candy. If you put candy elsewhere your box might not close.
    Cut a 1" x 5" strip of cardstock and adhere 5 Hershey’s kisses or other small wrapped candy to it with mini glue dots.

    Note:
    A roll of Rolos wrapped in cardstock also looks nice.
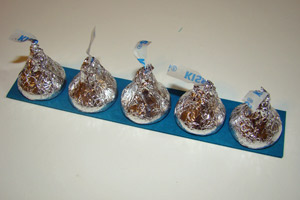
  14. Step 14

    Adhere the strip of kisses to the front of the box and insert a gift card. Decorate the inside of the box as desired.
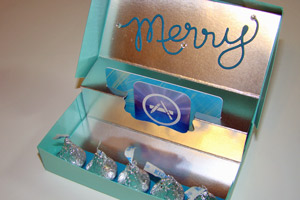
  15. Step 15

    Decorate the outside of the box with ribbon (this will help the box stay closed) and other embellishments.

Video!


From Splitcoast stampers.com


Tuesday, November 26, 2013

Quick Snowman Card

 
Dimensions 5.50 by 4.25
 Black stock cut at 1.25 by 4.25
Cut two out of black card stock
Hand cut  second black one to make it look like hat
Glitter
Punched out a circle in red card stock at 1.25
Them punched out another circle in white card stock at  1.00
Stamped on white circle
Added eyes
Hand cut out of orange card stock nose and hand did lines to make it look like carrot
Punched out  6 black circles  to make mouth at .25
Cut out red card stock at 1.00 by 4.25
Hand trimmed to make look life scarf
Punched out tag in red  card stock and punched out white card stock  to stamp saying on

Friday, November 22, 2013

Christmas Wishes

 
Dimensions 5.00 by 5.00 
 Used Quilted Christmas Cartridge
Cut base 5.00 by 5.00
Layer in white card stock cut at 5.00
Used stampin up stamp set called Gifts of Christmas
Embossed stamping with embossing powder and heat set
Stamped out dove  again and fussy cut out dove
Used double pop dots under dove to pop up
Liquid Pearls
Ribbon


Wednesday, November 20, 2013

Happy Hoilday Wishes Card

Dimensions 5.25 by 4.25
Cut pattern paper at 4.25 by 1.50
Ruffed edges of pattern paper
Green card stock cut at 4.25 by .50
Embossed green card stock
Used circuit cartridge Bags ,Tags, Boxes and More 1
Cut tag at 4.00 with whole
Stamped on tag with  Greeting Card Kids from stampin up
Hand colored image with colored pencils
Stamped snow flakes
Glitter
Glitter paper cut at 4.25 by .25 and tore up edges
 Ribbon
Lace added and hand gathered
Stamped on card base greeting
Ruffed up bottom edge of  card stock

Tuesday, November 19, 2013

Cardinal Christmas Card

 
Dimensions  5.00 by 5.00
Card base 5.00 by 5.00 in white card stock
Layer 5.00 by 5.00 in red card stock
Used circut cartridge Quilted Christmas
Used stampin up stamp set called Cardinal Christmas
Stamped on card stock
Used markers to color stamp
Fuzzy cut out bird  after stamping again
Doubled pop dotted up to stand up off page
Gemstone
Glitter
Cut  one square at 2.25 by.50 in red card stock 
Cut second square out of white card stock cut at 2.00 by .25
Stamped on white card stock
Pearl for eye on bird


Monday, November 18, 2013

Santa Post Card

Dimensions 5.25 by 4.25
Pattern card stock 5.00 by 4.00
Used creative memories envelope board to make envelope
Red card stock cut 5 5/8 by 5 5/8
Stamped post mark
Stamped stars
Glitter
Tine
Used cricut Art  Philosophy   cartridge cut postage stamp out
Postage stamp 1.25 by 1.25 in cream card stock
Stamped on cream card stock  and handed colored with marker
Used stampin up stamp set called Santa Post

Thursday, November 14, 2013

Two More Thanksgiving Cards


Dimensions are 5.50 by 4.25
Light brown card stock cut at 5.25 by 4.00
Pattern paper cut at 5.00 by 4.85
Used spellbinders cut and fold die to cut shape out of brown card stock
Used already made leaf and already made tag
Stamped saying on card
Tine
 
Dimension are 4.50 by 4.50 for base of card
Pattern paper cut at 4.50 by 4.50
Used Art Philosophy cartridge to make card base and cut pattern  paper
Use silk leafs on front of card
Cut out square with Art Philosophy
Size of light brown  card stock square is 1.73
Cream card stock cut at 1.50
Stamped saying in cream square
Punched out small leaf out of glitter paper
Liquid Pearls
 

Tuesday, November 12, 2013

Season's Greeting Card

 Dimensions are 5.00  by 5.00
Used Quilted Christmas cartridge to cut card base and layer
Layer of white card stock cut at 5.00
Used stampin up used Lace Ribbon  punch
To make boarder
Boarder cut 5.00 long
Added Pearls
Glitter
Stamped on card front

Saturday, November 9, 2013

Let's Celebrate with flower


Dimensions 5.25 by 4.25
Ripped  white card stock to 3.25 by 4.25
Added handmade paper  to bottom of white card stock
 Size of handmade paper 2.25 by 4.25
Stamped on square
Square size is 1.85 by 1.85 hand cut
Hand colored on stamping
Ribbon
Liquid Pearls
Glitter
Fuzzy cut flower center and popped it up
Stampin up stamp set called nature scape's
Stamped saying on handmade paper


It's beginning Christmas Card

 
Dimensions 5.00 by 5.00
Used Quilted Christmas Cartridge
Layer cut at 5.00 by 5.00
Stamped snow flakes
Glitter
Stamped saying on card front
Ribbon


Friday, November 8, 2013

Snowman Skating Card

 
Dimensions 5.50 by 4.25
White card stock cut at 5.25 by 4.00
Embossed white card stock
Used Lacey Labels cartridge to cut scallop  shape
Scallop cut at 3.00
Inked edges on scallop
Used stampin up stamp set called Snowy and Play
Hand colored snowman
Used puffy Velvet to puff up snowman
Glitter
Pearls
Ribbon
Used another stampin up stamp set called Pines and Poinsetties to  stamp out Christmas
Fuzzy cut Christmas


Thursday, November 7, 2013

Merry Christmas with Pines

Dimensions 5.50 by 4.25
Vellum card stock cut at 5.25 by 4.00
Embossed it and inked over embossing
White strip of card cut at 4.85 by 2.00
Inked edges of strip of white  card stock
Accent Essentials  cartridge used to cut squares
Squares cut at 1.50
Cut two squares
Inked edges
Used stamp set by stampin up called Pines& Poinsettias
Heat embossed berries on pines
Added washi glitter  tape 

Tuesday, November 5, 2013

Lip Balm Holder Card how to make them and Mine

Lip Balm Holder Card

This is a fabulous way turn a card into a little special something…

This is a great card to make for friends, co-workers and teachers – and you can buy themed seasonal lip balms (I got mine from Avon) to make them for the Holidays, Halloween, Easter, Valentines Day…any occasion…
Here is a Holiday card that I made for cute teacher gifts – the stamp set has been retired but you can use any stamps that you have to hand…I decided to go with a snowman theme as my lip balm had one on it.

Lip Balm Card
There are two pieces to this card as you can see from the photo below – you make an outer piece and an inner piece that has slots to hold the lip balm in place which is adhere together using a very strong adhesive – Sticky Strip works very well for this.
Lip Balm Card Empty Inside
How to make them…
For the outer piece I used Real Red cardstock – I cut a piece to measure 5 3/4″ x 3 1/2″ and scored it at 2 1/2″ and 3 1/4″ and then folded along those score lines – please see at the bottom of this page to find templates of measurements that I used.
For the inner piece I used Very Vanilla cardstock – I cut a piece to measure 5 5/8″ x 3 1/4″ and scored it at 2 3/8″ and 3 1/4″. I then stamped my sentiment in Real Red Ink and the snowflakes in Baha Breeze Ink using stamps from the Wishing You Cheer set which has been retired but there are other cute snowy themed sets available in the current catalog…
To make the band to hold the lip balm, I measured 1 3/8″ down from the top of my Vanilla cardstock and made a mark on the first score line – then I measured 1 3/8″ across from this line and drew a line as a guide for the first cut. Then I measured 1 3/8″ up from the bottom and did the same as above for the second cut. Using a craft knife and self healing mat I then cut along these two lines. You should have a band that is 1/2″ wide and this will pop out and provide the band to go around your lip balm.
To ensure that my lip balm doesn’t slide out of the band, I took my Slit Punch and made two slits – both at 1/4″ from the top and bottom edges of the cardstock – these will hold the top and bottom of the lip balm in place.
To assemble my card I adhered the inner Vanilla piece to the outer Red piece using strong adhesive and taking care not to stick down the little slit flap and the band – these need to be able to move out from the base.
I stamped my image for the front of the card and attached it to the base. I then used a 1/4″ Circle Punch to cut holes in the front and back and finished my card off by threading through a piece of 1/4″ Real Red Grosgrain Ribbon to hold the card together – what a great little card to receive – it is so fun to make and didn’t it turn out cute?
Lip Balm Card Inside
Measurements that I used…
Outer piece:
lipbalmoutside
Inner piece:
lipbalminside
WANT TO PRINT OUT THIS TUTORIAL?  PLEASE CLICK HERE FOR A PRINTABLE VERSION WHICH WILL OPEN IN A NEW BROWSER WINDOW


Saturday, November 2, 2013

Merry Chirstmas Card

 
Dimensions 5.50 by 4.25
Light blue card stock cut 5.00 by  4.00
White card stock cut at 4.85 by 3.85
 Used stampin up stamp set called Warmth and Wonder
Took one strip of white card stock
White strip size is 1.00 by 3.85
Tore the strips with fingers in half
Used glitter on top of each strip
Put strips  of paper together after glittered on top of already stamped back ground
Added ribbon to card


Friday, November 1, 2013

Season's Greetings Card

 
Dimensions are 5.50 by 4..25
Green card stock cut at 5.25 by 4.00
White card stock cut 5.00  by 3.85
Embossed white card stock at bottom
Glitter paper cut at.25 by 3.85
Used red and green washi tapes
Used stampin up stamp set Christmas Collectibles and ornament punch
Gemstone
Stamped saying next to ornament on white card stock