Monday, September 30, 2013

Thank you Card

 
Dimensions 5.50 by 4.25
Light green card stock cut at 5.25 by 4.00
Cream square cut at 3.50 by 2.50
Cut another square out of light green cream stock cut it at 3.25 by 2.25
Embossed light green cream stock
Liquid Pearls
Pearl button
Pearls
Gemstone in center of flower
Flower
Used Elegant Edges cartridge to card stock boarder
Boarder cut at 5.00 by 1.00 in cream card stock
Stamped in green saying on light green card stock


Friday, September 27, 2013

Bokeh Background

Bokeh Background

by Lydia Fiedler


Create a very simple, dreamy background inspired by a photography technique.

Supplies

  • Large stamp or die cut
  • Dye ink pad (Stampin' Up! Tempting Turquoise used here)
  • Metallic Gelato™ to match ink or other shimmery water-based medium (Metallic Blueberry Gelato used here)
  • Coloring medium to match ink(PITT artist pen big brush used here)
  • Pencil with new, flat white eraser

Step-by-Step

  1. Step 1

    Apply metallic Gelato directly to your stamp image.
  2. Step 2

    Using a water brush, wet the Gelato directly on the stamp.
  3. Step 3

    Stamp image, and then using water brush, fill in the edges with more Gelato to create a shadow image for the card base.
  4. Step 4

    Using the eraser like a stamp, add ink, and then gelato and stamp around your focal image - beginning close to the image and stamping farther away as the ink fades on the eraser.
  5. Step 5

    Continue stamping circles, some intense and some pale until you have the background you want.
  6. Step 6 (Optional)

    Add a finished image, popped up over the shadow you created, to finish your card.

Video!


Variations

  1. Highlight a die cut:
    Use a die cut or punched shape instead of a stamped image for the focal point.
From Splitcoast Stampers.

Another Halloween Card

Dimensions  5.50 by 4.25
Pattern paper  cut at 3.75 by 4.25
Ribbon and Lace
Black card stock  square cut   at 2.85 by 2.85
Brown card stock square cut  at 2.75 by 2.75
Brad
Black glitter
Stamped Spooky on brown card stock
Punched  whole  at .50 in card
Put on other side the whole circle to show threw the  to front
Stamped Bat on circle
Used  Toxic Treats  by stampin up to stamp fence out

Wednesday, September 25, 2013

My Diamond Fold Card and how to make one

 
Front of card not Open
Card Open
 Used Elegant Edges cartridge
Two squares cut at 4.00
Used Victorian Romance cartridges
People were cut at 3.00 and layers
Liquid Pearls
Glitter
Gold paint
Stamped on cream card stock saying
Create a special fold card with a few score lines.

Supplies

  • Scor-Pal™, or other scoring tool
  • One 4" x 12" strip of heavy weight patterned paper or cardstock
  • Ruler
  • Pencil
  • Additional cardstock, embelllishments and stamps to decorate your card

Step-by-Step

  1. Step 1

    Score 4" x 12" piece of patterned paper at 2"
  2. and at 10".
  3. Step 2

    Prefold at the score lines and turn paper over.
  4. Step 3

    On the back, mark the 6" mark on both sides.
  5. Step 4

    Take one end of the paper and fold it down diagonally at the 6" mark.
  6. Fold the opposite side down the same way.
  7. Step 5

    Unfold the score lines. Turn paper 180 degrees. Repeat the folding on this side.
  8. Step 6

    Unfold paper again. Hold strip vertically. Where the score lines intersect press the corners in to create a point.
  9. Fold the sides down.
  10. Step 7

    Fold the 2" part of the strip out.
  11. Step 8

    Fold the other corner in the same way.
  12. Fold the 2" side out. Your Diamond Fold card base is done.
  13. Step 9 (Optional)

    Add layers underneath the 2" x 4" sides.
  14. Step 10 (Optional)

    Add image or sentiment to the diamond in the center.
  15. You can leave the card open, or tie it shut with ribbon that you can slide off the side before opening the card.

Video!

Variations

  1. Inside out!
    Try folding the card so the diamond is in the back instead of the front of the card for a different look.
  2.  Spilt Coast Stamper Article and Pictures 


Tuesday, September 24, 2013

Harvest Card

 
Dimensions 5.50 by 4.25
Pattern paper cut at 5.50 by 4.25
Stamped out image
Fussy cut and  hand colored
Added leafs
Burlap and sting to stand on
Used already made saying to put on card


Saturday, September 21, 2013

Poinsettia Christmas Card

 
Dimensions 5.50 by 4.25
Pattern paper cut at 5.25 by 4.00
Used Joy of the Seasons  cartridge
Cut poinsettias out  of red card stock at 2.25 and layers
Used green card stock to cut of leafs
Glitter in red
Liquid Pearls
Drew in lines on leafs
Ribbon
Cut square at 1.50 by 1.50 out of cream stock
Inked edges of square
Stamped  saying on cream card stock 


Thursday, September 19, 2013

Folded Christmas Tree Card and How to Make it

 
Folded Christmas Tree Card See Article on My Blog How Make This Tree


Dimensions 5.50 by 4.25
Embossed cream card stock
Cream card stock cut at 5.25 by 4.25
Ribbon in red
Cut one red card stock to make rectangle at 2.25 by 1.50
Cut one cream rectangle at 2.00 by  1.25
Stamped on rectangle saying
Sequins red ,white and sliver

Folded Christmas Tree Card

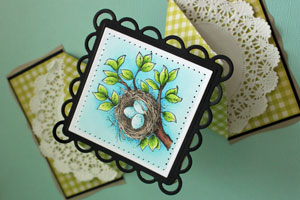
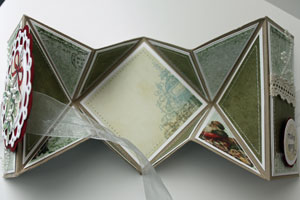
I saw a few of these folded trees last year, but never got around to trying it.  Until this past weekend, that is.  I cased  this card on Inkspired Treasures blog.  She has a pdf for the pattern for folding 
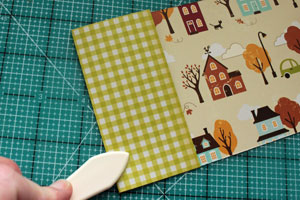
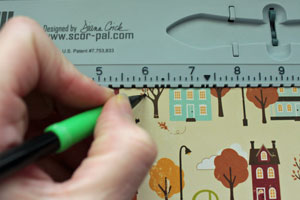
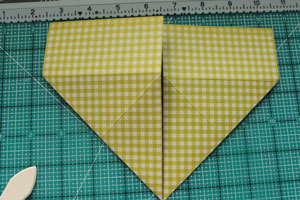
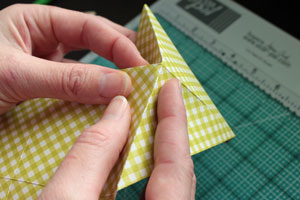
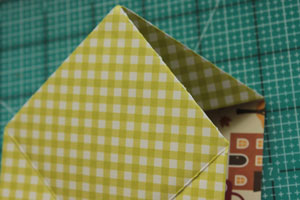
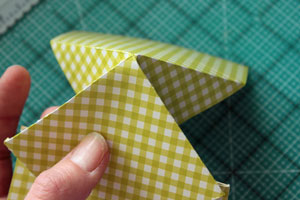
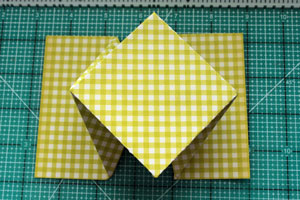
here.   I practiced with copy paper before messing up a piece of designer paper and my first one still isn't perfect.  You can see at the top left that I didn't fold it quite right.  But I still think the card is still presentable.
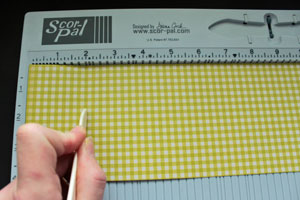
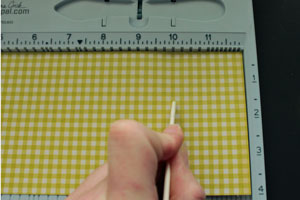
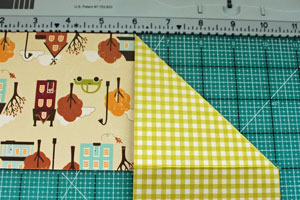
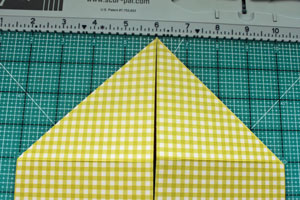
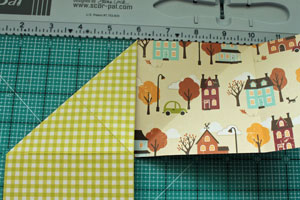
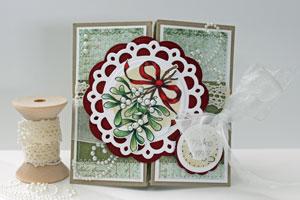
You need to cut a 5-1/4 circle (I used an old non Stampin Up cutting system).  Then cut that circle in half and make 3 folds.  I had a scrap of the paper used on this card big enough for 1 circle which yielded 2 trees.  I had a whole sheet of another pattern from the same pack, which made 8 more trees.  After a few, I finally got it down.
The original card used a gold glitter brad for the top of the tree, but it just wasn't working for me.  I remembered that my new Holiday Framelits (sizzix  died)has a little star in it. So I used that with Silver Glimmer paper and I like it much better. 
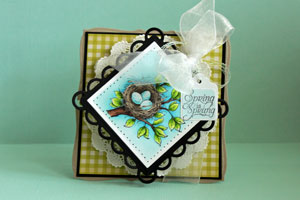
Stamp Set:  Christmas Greetings (retired) stampin up
Card Stock:  old olive, cherry cobbler, very vanilla, early espresso,  jolly holiday designer paper (retired), silver glimmer paper
Stamp Pad:  cherry cobbler
Other:  basic rhinestones, dimensional, old olive 1-1/4" striped grosgrain ribbon (retired), linen thread, petals-a-plenty embossing folder  holiday framelits, big shot.
www.bonnellsstamping.blogspot.com

Tuesday, September 17, 2013

Halloween Swing Card


Front closed card

 
Dimensions 8.50 by 5.50
Used stampin up thinlits Circle card die to make card base
Used my  own art work on card
Circle  die from set used to cut art work out with
Cut circle at 2.00
 Orange card stock cut at  50 by 5.50 and embossed on left side stamp web
Hand colored my art work
On right side of card stock cut strip of orange card stock
Orange card stock cut at 2.00 by 5.50
Black ribbon
Sliver paper cut at .25 by 5.50
Glitter  add to ball
 
Side of card
In side of card
Die cut  another  circle and stamped  in side of it
Inked edges of circle
Use premade card stock shape  next to circle
Stamped saying in it
Right of Card


Monday, September 16, 2013

Happy Birthday Card


Dimensions 5.50 by 4.25
Pattern paper cut at 5.25 by 4.00
Pattern paper brown cut at 5.00 by 3.75
Used Lacey Labels cartridge to make shape
Shape cut at 4.00 and embossed inked to bring out  back ground
Stamped on brown pattern  paper on all four corners
Stamped on brown  pattern paper Happy Birthday
Lace added
Gemstone
Used Summer In Paris cartridge
Tower cut at3.75


Saturday, September 14, 2013

Have a Wonderful Day

 
Dimensions 5.50 by 4.25
Teal pattern  paper cut at 5.25 by 4.00
Cream pattern paper cut at 5.00 by 3.75
Used spellbinder die to cut shape
Inked shape and embossed
Stamp heals and necklace
Brad for belt
Ribbon
Pearl
Liquid Pearls on heals  and necklace
Stamped on card stock
Used Forever young Cartridge
Dress cut at 4.00 and hat layer same size
Hanger added to dress
Colored pencils used to color heals


Thursday, September 12, 2013

Blender Pen Highlights

Blender Pen Highlights

by Kathy Racoosin


Learn to use a blender pen and distress marker to add shading to your images.

Supplies

  • Outline Stamp Images, Lawn Fawn Friendship Grows used here
  • Black Ink, Tuxedo Black Memento Ink used here
  • Alcohol based Markers, Copic Markers YG23,YG45, YR16, Y18, B12, B16, RV13, RV19 used here
  • Distress Markers, Ripe Persimmon, Salty Ocean, Pine Needles, Gathered Twigs used here
  • Water-Based Blender Pen, Dove Blender Pen used here used here
  • Glossy Accents
  • White Gel Pen
  • Black Micron Pen

Step-by-Step

  1. Step 1

    Stamp images with Memento Tuxedo Black ink. Add a line with a dark pink alcohol marker onto the petals.

    Note:
    This is an ink for coloring with alcohol markers & NOT recommended for water color markers but, it's works if you are careful.
  2. Step 2

    Color on top of the dark pink marker with a lighter color pink. This will soften the hard line on the petals.
  3. Step 3

    Add a medium yellow color to the flowers center.

    Note:
    This photo shows dots of the colors selected to use on the images for an easy reference.
  4. Step 4

    Add a darker color of yellow for the flowers center overlapping the lighter yellow color.
  5. Step 5

    Add some lines to the leaves with a medium green marker and continue to color the leaf with a lighter color.
  6. Step 6

    Repeat with blue markers to color the vase.
  7. Step 7

    This is the fun part.... Add some pretty highlights to your stamped images by using Distress Markers with a Dove Blender pen.

    Note:
    Since Distress Markers are water color markers you must be careful to not apply to much color. Always stamp an extra image to test what color distress markers you like best and or practice before adding color to your image. (This flower was tested using 3 different shades of blue and orange to see what would yield the desired look).
  8. Step 8

    Scribble theDistress Marker into a palette or onto a craft sheet. Pick up some of the orange color from the palette with the Dove Blender. Add the color from the Dove Blender to your petals giving them an orange wash. One time is a charm. If you over color your paper will begin to pill.

    A FEW TIPS FOR BEST RESULTS USING A DOVE BLENDER PEN:

    1. The dove marker Is being used instead of using a paint brush or a water brush. When water isn't being applied it's easier to control the color added to the images. A Dove Bender works great with most colored pencils as well.

    2. If you have a heavy hand when coloring use a heat tool and try on the back of the image between colors so your paper doesn't become to saturated.

    3. Aways scribble off the color from the tip of the Dove Blender on some scrap paper before switching colors just like you would do with a paint brush.
  9. Step 9

    Scribble a dark blue Distress Marker into the palette. Pick up a dab of the color on the tip of the Dove Blender. Add the blue starting in the corner of the petal and working your way along side of the petal to keep a shaded look on the petal. If the petal becomes to dark make a note to self to pick up less color on the tip of the Dove blender or scribble some color off on a scrap sheet of paper first before blending onto the petal.
  10. Step 10

    Add some brown Distress Marker to the flowers center.
  11. Step 11

    Take the small tip of the Distress Marker adding many teeny tiny dots in the cracks of the flowers to add some extra highlights to the petals.
  12. Step 12

    Dry your image with a heat tool on the back to be sure that its dry.

    A FEW TIPS FOR BEST RESULTS USING A WHITE GEL PEN.

    1. Adding some white pen accents on any image really enhance your overall project & always practice on scrap paper first.

    2. For best results with the gel pen place a dot on your finger and be sure to let the white dot "pool" on your finger. This way you know the pen is flowing nicely and is ready to go.

    3. If you feel that you added to much white pen on your image you can hid some of the white by coloring on top or use a black permanent marker (depending on where the white was added on the image).

    4. Trace around the white gel accents you placed on your image with a Micron .01 marker.
  13. Step 13

    Add some white around half of the dots on the flowers center. Trace around the white with a Micron .01 marker. This extra step will really make the white accents really stand out. However, you might be happy skipping this step. Use the black marker to enlarge the small black dots in the flowers center.
  14. Step 14

    Cut your flower out and bend the petals upward gently. (This particular flower has a die cut for quick results.) Add Glossy Accents to the centers of the flowers. Set aside to dry for a few hours or overnight.
  15. Step 15

    Cut some white card stock 4.25 x 5.5. Use washi tape to hold the stencil from Simon Says Stamp onto your craft sheet. Using a dauber blend some distress inks around the stencil.
  16. Step 16

    Using a ruler draw a black line to around the pattern with a Micron pen. Wipe the ruler clean between each line so you don't' get any smears on your card. Stamp lines on the blue vase and add some dots with the Gel Pen.
  17. Step 17

    Add some faux stitching around the black line for some extra detail. Die cut the sentiment banner from Simon Says adding a bit color with the Dove Blender. ts behind the images for dimension . Add to your card base.
  18. Step 18

    Stamp the sentiment with Hero Arts Black Die ink. Die cut the feather from Simonsaysstamp and color the same way as the flower adding blue highlights and a white line down the center. Layer your images and use pop do

Video!


From  www.splitcoaster stampers.com