A large variety of papers await the adventurous stamper who is willing to experiment and have some fun. Rubber stamps can be used on anything from tissue paper to heavy cardboard. Care must be taken to use the appropriate ink and techniques.
Here are some short descriptions of some of the basics:
By experimenting, you will find your favorites. The most important thing is to have fun!
S T A M P I N ' T I P S
|
Friday, August 31, 2012
Basic Paper
Basic Paper
Thursday, August 30, 2012
Liquid Applique How to use it
Liquid Applique
 Liquid applique is a great way to add a three-dimensional puffy look to your stamped art. Originally made for use on pre-washed fabric, it works very well on paper also. Liquid Applique puffs up on the paper after drying and heating. The fine tip on the tube makes it easy to apply even in the smallest areas. It can also be used to write a word, name or phrase. Liquid applique is a great way to add a three-dimensional puffy look to your stamped art. Originally made for use on pre-washed fabric, it works very well on paper also. Liquid Applique puffs up on the paper after drying and heating. The fine tip on the tube makes it easy to apply even in the smallest areas. It can also be used to write a word, name or phrase.
HOW TO USE LIQUID APPLIQUE:
S T A M P I N ' T I P S
T E C H N I Q U E E X A M P L E S
Click on an example for a larger view,
please use the BACK button on your browser to return  Stamped in Memories Black Ink then Liquid Applique was applied. The Liquid Applique on the butterfly wings was heated, the rest was allowed to dry and not heated. From the Stamping Place.com |
Wednesday, August 29, 2012
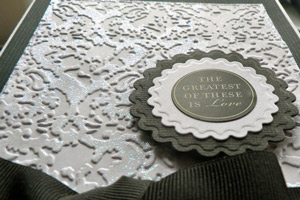
Glitter Highlighted Embossing
Glitter Highlighted Embossing
by Mary Anne Walters
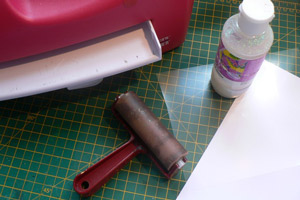
Add glitter over dry embossed card stock to create a sparkly background.
Supplies
- Glitter gel/glue
- Embossing folder
- Die cutting machine
- Rubber Brayer
- Card stock
- Piece of acetate
- Plain paper
- Reposition able adhesive
- Paper Cutter
- Small Paint Brush
- Flat Brush, optional
Step-by-Step
Step 1
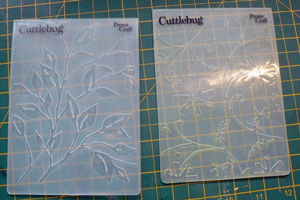
A word about the embossing folders:
Pick a folder with an edge to edge all over pattern, without wide open areas. These are good folders: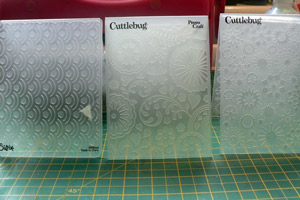
- These are less good - when brayering over the embossing, the brayer is more likely to apply the glitter into the wide open areas.
Step 2
Apply reposition-able adhesive to the inside back of the embossing folder. Stick thecard stock to be embossed to the folder. Run through your die cut machine to emboss.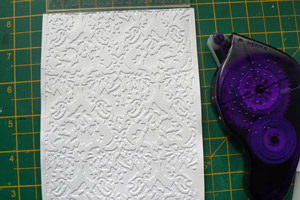
Step 3
Squeeze out a good blob of glitter gel onto the acetate.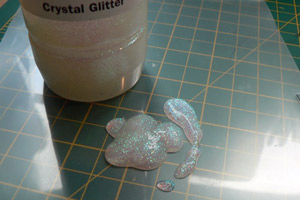
- Roll the brayer over it to load it with glitter gel.
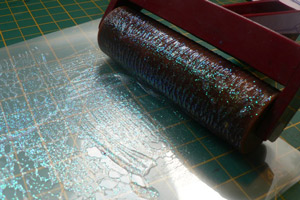
Step 4
Quickly roll the brayer onto the plain paper to smooth out the glitter gel. You want a thin coating, with no obvious blobs on the brayer.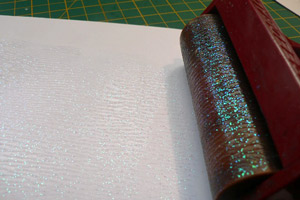
Step 5
With the embossed piece still in place in the folder, with a VERY light touch, roll the brayer over the raised embossing.
DO NOT put too much pressure on the brayer, to keep the gel just on the raised areas. Two light coats are better than one thick coat!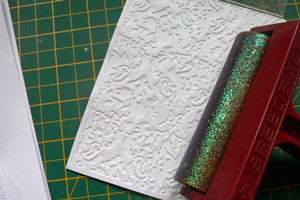
Step 6
If the gel slips into to recessed areas, you can whisk it away with a small paintbrush while it is still wet.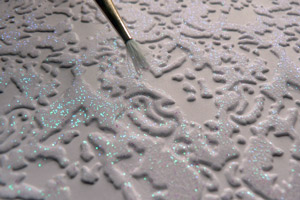
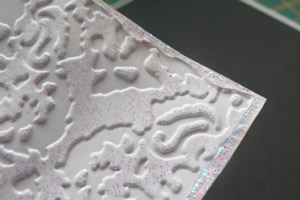
- Let it dry. This is what you will have:

Step 7
Gently remove the piece from the embossing folder. Trim the edges just to the edge of the embossing.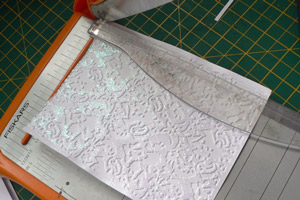
Step 8 (Optional)
For a nice finish, squeeze out another blob of glitter gel onto your acetate. Load a wide flat brush (a fan brush is great for this) with glitter gel.
Step 9 (Optional)
Holding the brush upright against the edge, drag it DOWN to lay a thick coating of glitter gel along the edge.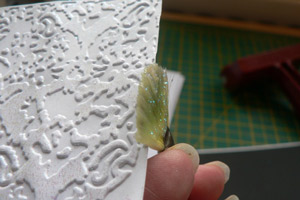
- Set aside to dry. This will take some time, as the coating should be thick.
Step 10
Finish your card.From Spilt Coast Stampers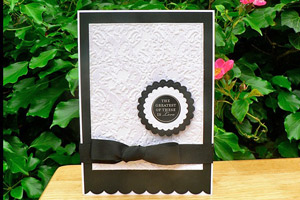
Video!


Tuesday, August 28, 2012
Tips of the Day
Will try to add tip each day
Tip of the day... Do you often end up with sticky scissor blades after cutting something with a high tacky adhesive? I have found to get the glue off, use alcohol wipes on the blades. A quick wipe or two and the blades are good as new.If stamp edges keep getting ink on it. Use clear tape on the edge and will not leave and edge when you stamp.
If clear stamp will not stay on block wash it soap and water. Dry the stamp and it is ready to go and stick on the block again.
Washing your cricut mats in hot soapy water and using scrub pad while doing it. Rinse in hot water let air dry and they will be sticky again. I do this all the time and works great.
Keep baby wipes on hand to clean edges of stamps and clean hands with.
Make your own scrub holder for cleaning stamps. I use an old stampin up case and plastic container that is long will work. I went to hardware store and bought a package of edge painting pads. Two come in the package. They do not cost a lot and two will fit in large stampin up case.
Wooden nail files work to smooth edges when you cut something from the cricut that did not cut all that smooth. Nail files as work to to distress edges of paper for worn look on paper.
Be sure to test stamp on paper. The stamp maybe up side down and you may need to change it. Also good way to make sure ink is not on edges of stamp. That way with baby wipe you wipe the edges before you restamp. It would be shame to have to redue a card.
I buy 3m mounting tape for making my own pop up for cards. You can buy a roll at any hard wear store. It is about $8.00 for a large roll. Will in long run save you money.
Ever run into a problem trying to figure out how to spread liquid adhesive over a large area? Well try this - those phony plastic credit cards you received in mail. Phone cards work well too. You can simply use these wasted plastic cards as glue-spreaders like trowels! Use the plastic card to swipe and spread the liquid glue into a thin, even layer of glue over a big surface area. When you're done, just wipe the card clean and reuse them again and again. I know it's not brain surgery, but sometimes the most obvious things aren't so obvious - LOL - Hope it helps.
Shaker Card Tips
Shaker cards are made with a piece of foam core board between two pieces of card stock. A window is cut through the center of the foam core board and also through the front piece of card stock. A piece of acetate (clear plastic) is placed between the front card stock and foam core so that you can see into the opening. Small objects such as confetti are placed in the opening in the foam core board so that they move around when the card is shook.Shaker card adhesive - After looking for the ideal adhesive for assembling shaker cards, Mono Adhesive permanent bond by Tombow was recommended by another stamper.
Be sure to use a brand new craft knife (X-Acto knife) when cutting out the piece of foam core and the center of the foam core. Otherwise the foam core will have rough, messy edges.
Hold the craft knife blade at a right angle to the foam core when cutting to get straight edges.
When assembling, place the adhesive right next to the opening in the window without letting it show through the window. This will reduce the chance that confetti or other items inside will get stuck between the layers when the card is shook.
Apply the adhesive continuously, without any gaps around the opening in the foam core board in order to reduce the chance of "leaks."
Fill the inside of the foam core board window with confetti, store-bought snow, small seashells, sand, or anything else you might find.
To cover rough foam core edges, cut strips of paper to fit and glue in place.
Make your own sanding block reuse blocks that you have taken your stamps off . Buy sand paper from hard wear store. Wrap it a round block the and it is ready to go.
If your cricut mat does not want to stay,try finding Popsicles stick and rubbing a round the edges it will hold it down so you can cut.
Save soda tabs they make great items to put ribbon threw on a card. They can be painted any color.
ALL my crafting friends out there, anyone who crafts with paper flowers, if you get them and they are out of shape or kinda smashed, spritz them with water and you can get their shape back, you will have to pick at them etc, but it is better than throwing them away. Just and FYI ;o) Have a great rest of the day.♥
How to make your title stand out from the background paper.
Have you ever die cut a title out and then laid it out on your page only to be less than impressed with the way it looks? Sometimes die cut titles tend to blend into the background paper. To make my titles stand out, I often use a simple outlining technique to create a "shadow" of sorts around my letters. You can use a black, white, or colored pen to just trace around the edges of all the letters. You will be amazed at what a difference it makes!
Buy cheep make-up sponges you can use them ink edges of cards.
Real sponges you can use to make back grounds on card. All you have to do is ink the sponge and tap on the card stock to make a back ground.
Save your bread ties. You can use nail posh to remove word. Then put them on a card.
Save buttons as and use them on cards.
Call your local paint store as they sometimes give wall paper books out for free. It is a lot of paper. Today I got 6 new wall paper books
Save shoes boxes that have open and closed lids. You can put your ink pads in them.
Drywall Tape...it has many uses.
1. Use it like ribbon (especially on masculine cards). 2. Use with cutting machines - when I cut on my cricut and the image has several parts (like a word that isn't welded), put the drywall tape over it and the parts stay together. Run it thru the Xyron and then press on your page. The DT doesn't stick to the letters. 3. Cut the DT in small pieces it holds the ends of ribbon down (while on the spool). 4. Use DT as a template when spritzing or sponging ink for a cool pattern.
Buy cheep plumber gaskets to use in cuddle bug with sizzix texture plates. Get them at any hardware store.
Make Sure the mat is clean and sticky before cutting with the Expressions
The biggest key to successful cutting,next to using proper blade settings,is making sure your mat is in good condition.
Clean off all little bits of paper and placing new card stock on mat.
Cover mats when not using them.
Replace mats when will not hold card stock.
Can use Scotch tape or painters tape to hold edges of mat down.
Buy fun foam at craft store. It makes s great surface to put under paper for clear stamping. Makes the clear stamp work better.
MOD PODGE - Homemade Mix 50% Elmer's glue and 50% water in a jar. Wish I would have known about this a couple days ago.. Mod Podge isn't cheap!
Save beard tags you can paint them and put them on cards.
Save tops of soda can put them over clothes hanger and them put another hanger threw the hole and it will save closet space for your clothes.
Cut soda bottles bottoms off and hang on wall to store craft items in. Be sure to take labels off.
Buy colored paper clips at dollar store. You get 90 of them for dollar.
TIP OF THE DAY.... you can get these boxes at the PO. you don't pay for them until you ship them out. i cut them down to store my pads of paper all the time.
Micheals arts and craft store brand paper is made in Usa.
Tip of day- get wall books and use paper in cricut to cut out shapes with. Use regular card stock setting.
Saving Paper! There are a TON of ways to save paper out there but here are some of my favorites. Two-sided paper is our friend!
Simply by cutting the paper, flipping it over & attaching it to a cheap, plain background paper you can get a great look. I also like to cut photo mats out of the wasted paper behind a large photo or embellishment. I just turn the paper over & make a rough cut with my scissors. Obviously, you need to be very aware & careful of what is on the other side. Preplanned also saves you a lot of time & paper. If you know all the cuts you're making on a sheet of paper you can plan all your cuts so that you don't end up with a ton of small unusable scraps. If you're like me, you love the layered look but hate all the wasted paper. I like to create borders using small strips of paper. You can overlap the corners; use embellishments to hide the corners or you can miter them.
An easy way to miter, without measuring, is to attach the strips at the middle, overlapping the corners. Then with scissors, cut through both strips of paper at an angle, then attach them. By doing this you ensure that the 2 strips match up very well.
Tip buy wrapping paper you can use on cards and scrap book pages.
Stamping tip: buy fun foam to put under card stock for using clear stamps with it will give better stamp image.
Your Own Clear Embossing Glue
1. You ne
ed 1 tsp of petroleum jelly; Vaseline is used here.
2. Mix in 1/8 capful of vegetable oil.
3. Mix in 1/8 capful of alcohol to dilute.
4. Mix together. It doesn't make a lot but it does make more than enough to rehydrate your ink pad.
5. You need a cosmetic foam applicator to smear some on the pad and then removed any extra.
6. Do a test stamp by putting the stamp on the pad.
7. Press down on the paper.
8. Sprinkle with the embossing powder of your choice.
9. You will see that the embossing powder stuck.
10. The embossed stamp after using a heat gun on it.
Mount more than one clear stamp randomly spaced onto a large rectangular block to create your own background stamp. 2. Mix in 1/8 capful of vegetable oil.
3. Mix in 1/8 capful of alcohol to dilute.
4. Mix together. It doesn't make a lot but it does make more than enough to rehydrate your ink pad.
5. You need a cosmetic foam applicator to smear some on the pad and then removed any extra.
6. Do a test stamp by putting the stamp on the pad.
7. Press down on the paper.
8. Sprinkle with the embossing powder of your choice.
9. You will see that the embossing powder stuck.
10. The embossed stamp after using a heat gun on it.
Building words and sentences.Placement on the paper is easy with clear stamps. However, placement on the block isn't that easy -- especially with small letters and words. I have found much better results if I stamp one word or one letter at a time on to the paper, rather than trying to align the letters onto the block. Also, you will be able to get the letters closer to one another on the paper if you stamp them one at a time. However, if you put the letters on the block first, the trim on each clear letter will bump up against the next trim, putting a small space between the letters. For example, in the card above, "I Will Always" is 3 separate clear stamps and I stamped each one at a time, rather than trying to put them on a block at the same time.
Scratch and Sniff Card!
Items you will need:
1. Craft or embossing ink in color of your choice
2. Clear embossing powder
3. Embossing gun
4. Rubber or acrylic stamps
5. SUGAR FREE Jello in your choice of flavor.
Instructions:
1. Start by mixing 1½ parts of clear embossing powder with 1 part sugar free Jello. Be sure to use sugar free or the sugar will burn when you heat it.
2. Mix 1½ tsp of embossing powder with 1 tsp Jello
3. Stamp image or images with ink and sprinkle with powder mixture.
4. Heat emboss until melted.
5. When cooled, scratch and sniff!!
Tip today save the in side of cookie box tray to hold ribbon in or tape.
Rolling pen you can use on embossing folders to them to emboss if you do not a embossing machine.
Tic Tac holders make great storage ideas for small ribbon.
A Dab of vasoline onto the tip of glue gun will eliminate those long glue strings.
Use coffee filters to die cut flowers out.
Do not have embossing buddy try wax paper or dryer sheets before you emboss on your card.
Monday, August 27, 2012
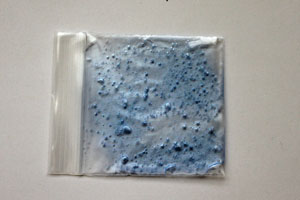
Gel Card
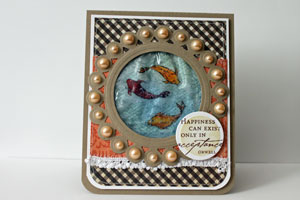
Gel (Water) Card
by Beate Johns
This is a wonderful touch and feel card. No one can resist to play with it for a bit! You will definitely WOW the recipient of this card.
Supplies

- Cardstock
- Patterned Paper (optional)
- Ziploc™ bag ( 3" square bag used here)
- Hair gel
- Circle Nestabilities™ die or other circular die or punch
- Scor-Tape™, or other strong double sided adhesive
Step-by-Step
Step 1
Squeeze some hair gel into your ziploc™ bag. Only add enough to cover the inside of the bag. Too much gel might cause the bag to "pop" later on.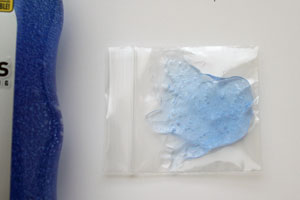
- Press excess air out of the bag, close it and spread the gel evenly over the entire inside of the bag.
Step 2
Adhere and decorate your card front layers.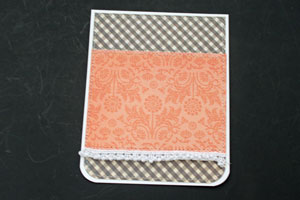
Step 3
Cut a window into your layers with your circle die.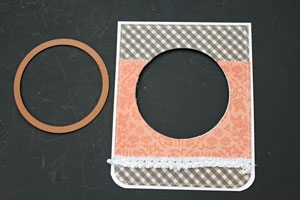
Step 4
Turn your card front around and add Scor-Tape™ around your window.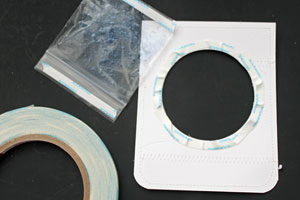
Step 5
Adhere your gel bag over the opening.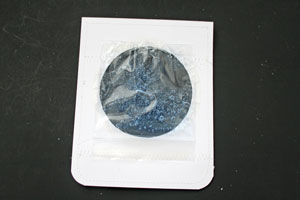
Step 6
Create a scene for behind your gel bag window.
Step 7
Adhere your scene behind the window..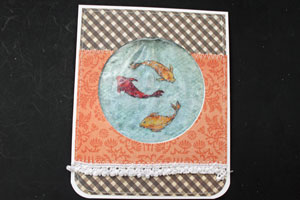
Step 8
Adhere the layers to your card front with dimensionals and finish decorating the card.
Tip:
If you plan to send a gel card through the mail, use a padded envelope to prevent the gel bag from popping.From Spilt Coast Stampers
Video!
Imagine Wobble Card
 |
| Dimensions 5.50 by 4.25 Cut off 2 .00 the card front Cut center green banner at 3.00 ( AP ) cartridge Cut butterfly at 2.00 and layers ( AP) cartridge Lace added to each side of Banner Embossed banner Elegant Cakes cartridge used to cut boarder at 1.00 by 4.25 Stamped saying on card front Butterfly has Wobble under it to make move |
How to make Wobbles
Thanks for visiting and have a great day! How make wobble springs is from The Paper Boutique.blog spot.com
Saturday, August 25, 2012
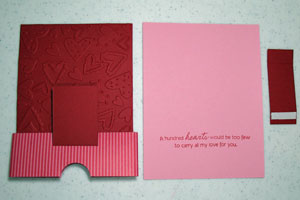
Sliding Pop-Up Card
Sliding Pop-Up Card
by Kim Score
Create a card that moves, pops and stands all at once with this sliding pop-up technique.
Supplies
- Score board and bone folder, or scoring blade for paper cutter
- Strong adhesive
- 1" Circle punch
- One 5 1/2" x 4 1/4" piece of heavy cardstock for card base
- One 5 3/8" x 4" piece of heavy cardstock for pop-up back
- One 1 1/2" x 9" piece of patterned paper for sliding wrap
- One 1 1/2" x 2 1/2" piece of heavy cardstock for pop-up front
- One 1" x 2 3/4" piece of heavy cardstock for back pop-up mechanism
- One 1/2" x 1 1/2" piece of heavy cardstock for front pop-up mechanism
Step-by-Step
Step 1
Stamp or emboss pop-up back as desired.
Score the following pieces as follows:
5 3/8" x 4" - score at 1 1/2" on long side
1 1/2" x 2 1/2" - score at 1/2" on long side
1" x 2 3/4" - score at 1/2" on each end
1/2” x 1 1/2” - score at 1/2" on each end
Apply adhesive below score lines. For 1" x 2 3/4" piece, tape one end then flip to other side and tape other end.
Step 2
Attach sliding wrap at bottom of pop-up back.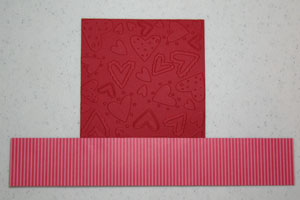
- Attach pop-up front piece on score line of pop-up back.
Attach front pop-up mechanism at score line of pop-up front piece.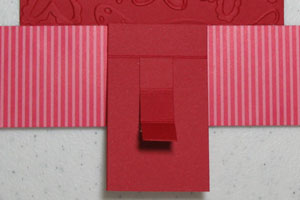
Step 3
Fold front pop-up mechanism towards score line of pop-up back.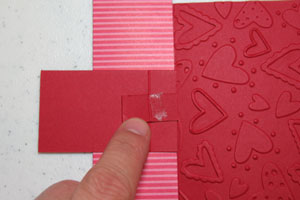
Step 4
While holding pop-up mechanism in place, fold pop-up back forward to adhere to pop-up mechanism.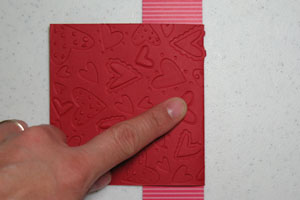
- Pop-up front should now be assembled as shown.
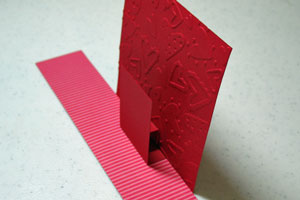
Step 5
Fold down flat and apply tape to one end of wrap. Place card base behind pop-up back with bottom edges aligned. Turn over and adhere wrap piece in back (don’t stick to card base!). Wrap should be snug but allow card to lay flat.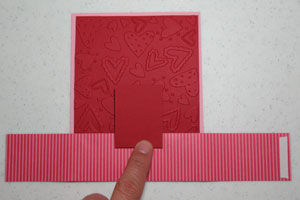
Step 6
Slide card base out from wrap and stamp greeting about 1” from bottom. Punch through pop-up back piece as shown.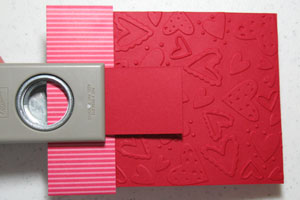
Step 7
Adhere back pop-up mechanism 1” from edge of card base and lay flat.
Step 8
Slide wrap piece onto card base. Line up sliding wrap at bottom of card base and then fold flat, adhering to back pop-up mechanism.
- Add stamped or punched pieces to front of pop-up.

Step 9
Your image will pop up when you pull on thecard base. From Spilt Coast Stamper
Video!
How to Use Cricut to Make your Embossing Folders

Items you'll need are:
Cuttlebug (or other press machine)
Cricut (or other diecut machine)
Scrap Card stock
Tape Or Glue
Step 1: Choose your cricut design or image you'd like to have embossed and cut the same image 3 or 4 times with scrap cardstock. I've chosen these starfish from the Life's A Beach cricut cart. Be sure to cut them the same size. (You could use any flat item, really.. chipboard shapes, chipboard alphas etc.)

(So sorry if this green hurts your eyes. I was trying to use up old scraps lol)
Step 2: Glue or tape each piece right on top of each other.


For my project, I used 3 pieces of cut cardstock, but you may need to use 4. You might have to experiment a little. Try to glue the stack as close to even as you can.

Choose the cardstock you wish to be embossed.
Step 3: Create your sandwich for the Cuttlebug.Or any othe die cut machine that uses layers.

Stacking from the bottom, you will need...
A Plate
B Plate
Your already made cardstock diecut
Your Core'dinations cardstock (face up)
Rubber embossing mat
B Plate
After you crank it through, your cardstock should look something like this..

If your imprint isn't raised enough, you'll want to add a 4th diecut piece to achieve your desired imprint.
Then just create your card or project and you're done! :)

Depending on how many dies or Cricut carts you have, you can have a lot of fun with this technique! The possibilities are endless!
Subscribe to:
Posts (Atom)