Saturday, August 31, 2013

Spider Halloween Card

 
Front of Card
Dimensions  for base of card 5.00 by 9.50
Base of card cut out of light brown card stock
Cut another card out of pattern paper same size
Cut in half to line up with front of care
Kept spider from first card saved it
Stamped spiders four of them on pattern paper
Glitter on eyes
Added pre-made web to card
Stamped saying on front of pattern paper
In side of card
Used saved spider to put in side of card
Spider layers cut 1.50
Match up spider with cut on front of card
Hand colored on spider with markers
Used wrap it up cartridge
Can cut two cards out of 12 by 12 card stock


Friday, August 30, 2013

Halloween House Tri-Fold Card

 
Tri-Fold Front of House
Dimensions 4.25 by 7.50
Used Mini Monsters Cartridge to make house
Pressed house button on cartridge and card layer
All layers are 4.25 for house
Used Happy Haunting cartridge to make ghost
Cut  three ghost at .50 from Happy Haunting cartridge
Glitter added to ghosts and windows on house
 
Sides of House
Inked shutters with white gel pen
House all way Open
Stamped with stamp on  in side of card


Thursday, August 29, 2013

Just saying Hello


Dimensions 5.50 by 4.25
 Used stampin up  lace ribbon boarder punch
Punched out boarder in pink card stock at 5.50 by  1.00
Used Flowers shop stamp set to stamp flowers
Used Pansy punch to punch out 3 flowers out
Punched flower in corner of  white card stock
Put flower  on  in side  of card stock and lined up with punched flower
Used three gemstones for centers of flowers
Paper pierced on white front of card stock
Stamped in side of paper piercing


Wednesday, August 28, 2013

Take to your Leader Halloween Card

 
Dimensions 5.50 by 4.25
Pattern paper cut at 5.25 by 4.00
Use Accent Essentials cartridge to cut circle out
Circle is green card stock
Circle cut at 3.24
Used Mini Monsters cartridge
Monster cut  at 2.50 and all layers
Saying cut at 1.50  from Mini Monsters cartridge
Inked stitch lines on circle and monster
Added different size eyes
Colored nails with marker
 

Monday, August 26, 2013

Tri Fold Card Halloween

 
Dimensions  4.00 by 10.50
Used Mini Monsters cartridge to cut card  base out ( 4.00 by 10.50)
Pushed button that says card on over lay and hit tree to cut card
 
Back ground paper cut 4.00 by 3.50  glued it on base of card
Embossed fence and inked it to bring out texture
Used Halloween Haunting cartridge
Cut tomb stone at 2.50 and all layers same size
Stamped saying in side of tomb stone in black
Inked on tomb stone
Glued all layers together and pop dot on back to tomb stone
Mummy cut at 2.00 and layers same size
Pop dot the mummy to stand
Embossed Mummy and inked on it
Glitter used for eyes
Used Seasonal Cake Art cartridge
Cut Moon at 2.00
Glitter used on Moon and for stars


Saturday, August 24, 2013

Lamp Halloween Card

 Closed Card
Dimensions are 5.50 by 4.25
Lamp Card cut from Mini Monsters cartridge
Lamp was cut 4.00 and all layers
Embossed light brown card stock
Light brown card stock cut 5.25 by 4.00
Went over embossing with chalk
Card Open
Used Happy Hauntings Cartridge
Ghost cut at 2.50 for big one
Small ghost cut 1.00
Inked in  eyes on both ghost

Thursday, August 22, 2013

Thinking of you


Dimensions 5.50 by 4.25
Embossed white card stock
White card stock cut at 5.00 by 4.00
Used Flower Shop Cartridge
Cut six  flowers at 1.00 no layers
Cut six more flowers at .50 no layers
Added Pearls to each flower
Added lace trim
Stamped saying on white embossed card stock

Wednesday, August 21, 2013

Tree Four Fold Halloween Card

 
Card Closed
Added cat  sticker and web sticker
Left side of Card
Dimensions 4.50 by 9.00
Used Mini Monsters Cartridge
Card was cut two times at 4.50 by 9.00
First cardcut out of brown card stock
Second card was cut out of pattern purple
Also used Holidays Cake cartridge
Cut moon  out of yellow card stock
Moon cut 1.50 cut off extras on side of moon
Cut bat of black card stock 1.50 and put on moon
Glitter
Stamping saying on left side of card
Right side of Card 
Hand colored on tree
Eyes added to tree

Sunday, August 18, 2013

Shaped Halloween Cards

 
 My first shape card
 

 Dimensions 5.00 by 5.00
Used Mini Monsters Cartridges
Cut all layers at 5.00
Used Seasonal Cake Art Cartridge
Cut out grass at 1.00 by 6.00
Added brad
Goggle eyes used two different size eyes
Hand drew stitch lines
Maker to added nails 
Dimensions 5.00 by 5.00
Used Wild Card Cartridge
Cut card and layer at 5.00
Used Happy Haunting Cartridge
Ghost cut at 2.50
Used Seasonal Cake Art Cartridge
Grass cut 1.00 by 6.00
Brad
Glitter
Hand colored glass and on pumpkin
Goggle eyes added
Punched out 1.00 circle and stamped saying on it
 

Saturday, August 17, 2013

Halloween Card

 
Dimensions 5.50 by 4.25
Used purple card stock cut at 5.25 by 4.25
Used Happy Haunting Cartridge
Witch was cut at 2.50 and  all layers
Fence cut at 2.00
Tree cut at 4.00
Moon was punched at 1.00
Glitter
Googly eyes add to witch
Tot let  paper used on tree
Marker on tree
Marker used in witch to  do stitch lines
Hand wrote saying on  card
Twine


Friday, August 16, 2013

Spook-tacular Halloween Card

Dimensions 5.50 by 4.25
Pattern paper cut at 5.25 by 4.00
Black card stock cut at 4.00 by 2.75
Crimped black card stock
Ribbon
Used Pearlescent card stock
Used Accent Essentials cartridge
Cut orange pearlescent card stock at 1.50 cut out three circle
White card stock cut at 1.25
Cut three of them
Stamped in up stamp set batty for you set
Stamped spiders on card pattern paper
Stamped saying on pattern paper
Liquid Pearls for eyes on spiders
Google eyes

Thursday, August 15, 2013

Halloween Card Ghostly

 
Dimensions 5.50 by  4.25
Embossed gray base of card stock
Used Happy  Haunting cartridge
Cut frame at 4.00
Ghosts cut at 2.50 and layers
Hat on ghost cut at 1.00 and layer
Used Billionaire Cartridge
Billionaire was used to cut bow tie at 1.00
Lace
Ribbon added to frame
Gemstones on corners
Type cut at .50 from Happy Haunting
Inked in faces
Flower

Wednesday, August 14, 2013

Trick or Treat

Dimensions 5.50 by 4.25
Blue pattern paper cut at 5.25 by 4.00
Brown pattern card stock cut at 5.25 by 2.25
Orange card stock cut at 5.25 by 1.25 and embossed
Ribbon tab on right side of card
Glitter
Used  Happy Haunting cartridge
Owl and all layers cut at 2.50
Moon was punched at 2.50
Colored with marker on branch
Trick or Treat cut at 1.00 and no layer

Tuesday, August 13, 2013

Haunted House Card

 
Dimensions 5.50 by 4.25
Embossed gray card stock
Used Holiday Cakes Cartridge to cut out house
House cut at 4.00 and layers
Embossed house and distressed it
Cut two ghosts at  .50
Glitter
Inked in eyes of ghost
Added  already done saying on gray card stock


Monday, August 12, 2013

Man's belt card

 
Dimensions 5.50 by 4.25
Card stock with dots cut at 5.50 by 3.25
Embossed the edges of doted card stock
Cut stripe card stock at 2.50 by 2.50 to make square
Cut white card stock at 2.50 by 2.50 to square
Trimmed   white card stock to make pocket
Embossed pocket
Drew stitch lines
Distressed the pocket
Used Lacey labels cartridge to make belt shape
Belt shape cut at 2.00
Embossed belt shape
Drew stick lines on belt shape
Inked edges on belt shape
Inked on top of embossing on belt shape
Cut two strips of blue card stock
Two strips cut at 4.25 by 1.00
Inked the edges
Trimmed one strip to make look like end of belt
Brads used three of them
Cut a tag at 2.50 by 2.25
Inked tag edges
Stamped saying on tag
Punched whole into  tag to add string


Saturday, August 10, 2013

Love Tea bag folding Card

 
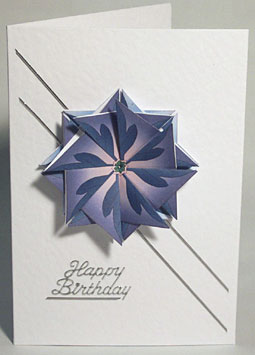
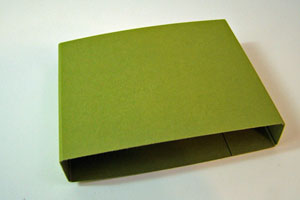
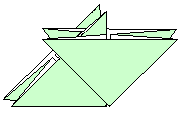
Dimensions 5.50  by 5.50
Pattern Paper cut at 5.25 by 5.25
Punched out corners
Vellum on top of  pattern  paper
Tea Leaf Folded the flower
Stamped love on pattern paper

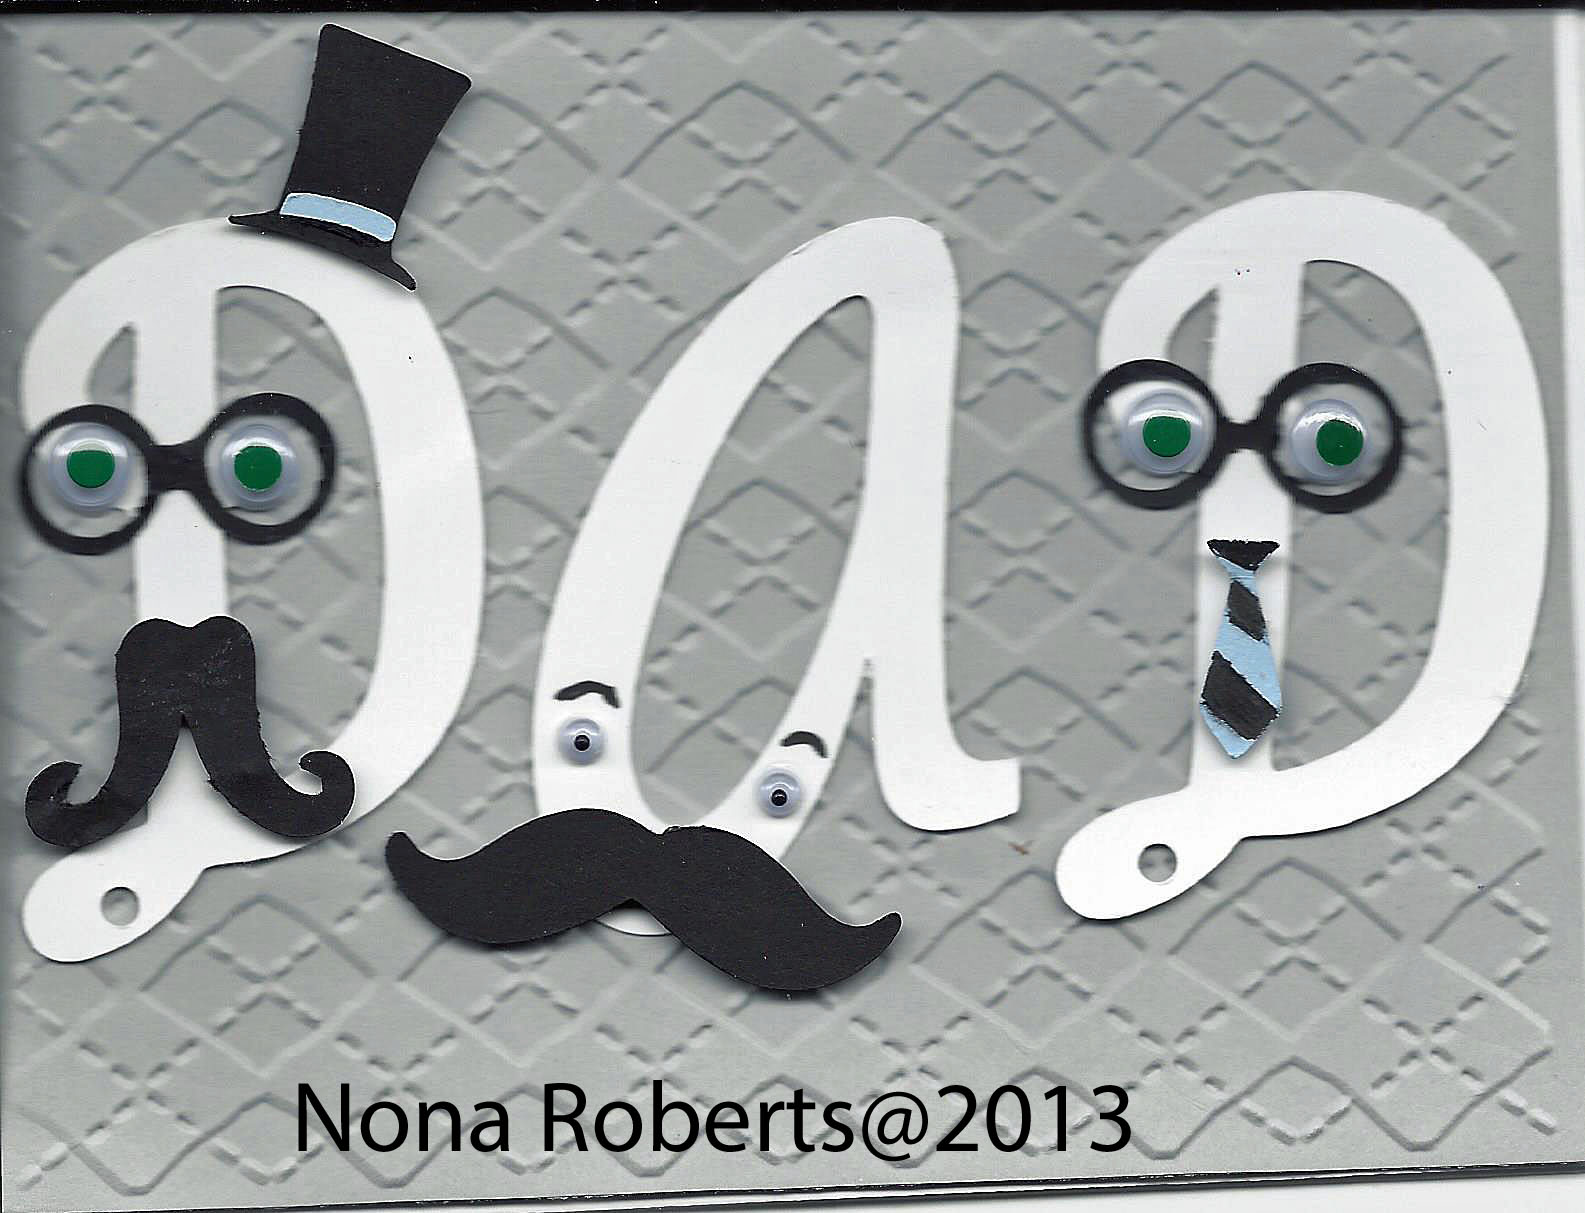
An introduction to tea bag folding

Tea bag folding uses some of the techniques of Origami combined with tiny squares of patterned paper. Once folded these squares are combined in attractive geometric patterns to form a larger design.
The art of tea bag folding is said to have been born when a clever Dutch crafter decided to work with the decorative envelopes used to hold fruit tea bags. As the craft developed specially printed sheets have been produced with patterned squares ready to cut out and fold.
Any patterned paper could be used but part of the attraction of the assembled tea bag patterns is the repetition of the design elements.
Equipment
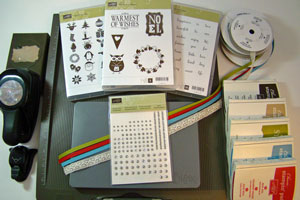
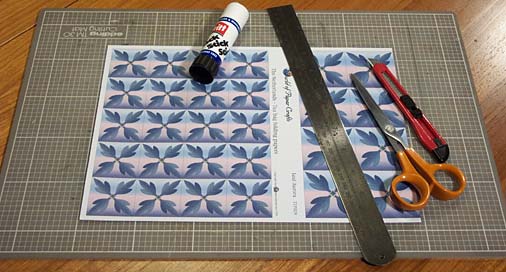
Equipment for tea bag folding together with a sheet of "Leaf Aurora" tea bag paper.

Equipment for tea bag folding.

  • Cutting mat
  • Metal edged ruler
  • Craft knife
  • Scissors
  • Paper adhesive
Cutting a square
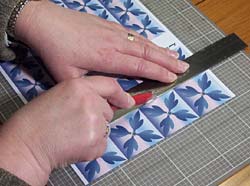
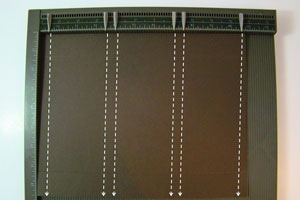
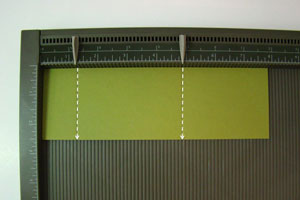
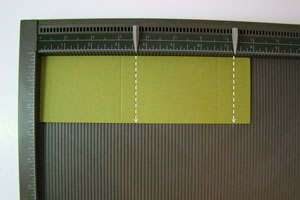
Lay your sheet of tea bag paper on your cutting board. Line up with the grid on the cutting board. Cut a strip of squares using a metal ruler and a craft knife.
Cutting a square
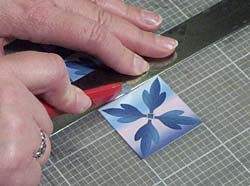
Cut a single square.

Folding the paper.

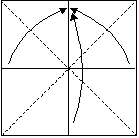
On the diagram the green shaded areas represent the right side of the paper, the white areas the wrong side of the paper.
The dotted lines represent folds you are about to make, the solid lines represent folds you have already made.
FoldingFoldingStep 1.
In step 1 and 2 you are creating creases by folding and unfolding.
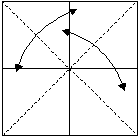
1. Fold the paper into half and then unfold it. Fold in half the other way and unfold it.
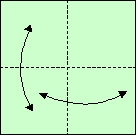
FoldingFoldingStep 2.
2. Turn the paper over and fold from corner to corner then unfold it. Fold the other two corners together then unfold it.
FoldingFoldingStep 3.
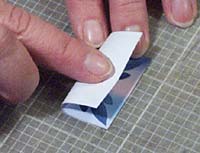
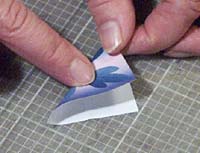
3. Fold the lower half up and the outer edges into the centre, manipulating the creased paper into shape 4.
FoldingFoldingStep 4.
Fold a total of eight shapes to this stage.
Assemble the shapeAssemble the shapeStep 5.
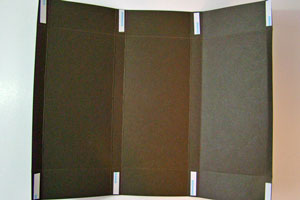
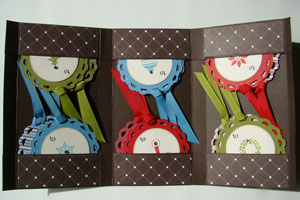
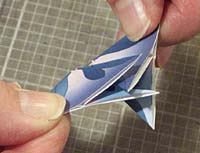
5. Slide a second folded sheet between the V of the first shape. Note the way the V's of each piece go together.
Fix with adhesive
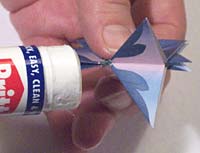
Fix the pieces with paper adhesive as you assemble the shape. If this is your first try it might be best to assemble it dry to start with, then fix it with adhesive when you are satisfied you have the correct method.
Fix with adhesive
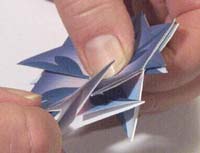
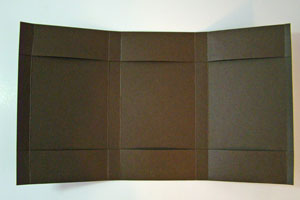
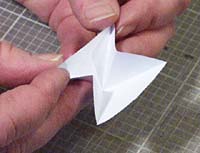
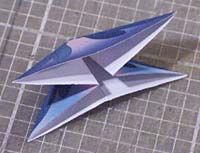
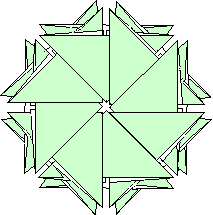
6. Continue sliding new pieces into the V of the previous piece until the design is complete.
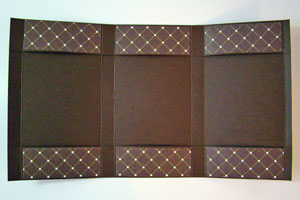
The last piece of the set will take a bit of manipulation to get it into the correct position. Study the finished diagram to see how it should look.
Assemble the shapeAssemble the shape


The finished card
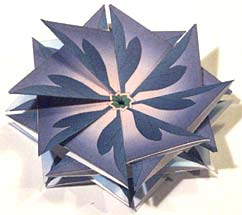
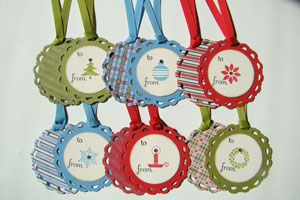
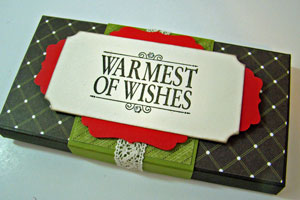
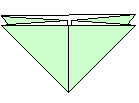
Mount the finished design on the front of your greetings card.
From www.cardinpirations.co.uk


Friday, August 9, 2013

You still have a full deck

 
Dimensions 5.50 by 4.25
White card stock 5.25 by 4.25
Used computer to write on saying on card stock
Used Father's Day cartridge
Cut out chips and cards at 2.50
Glitter
Ribbon
Button
Cut strip  of red card stock at 1.75 by 4.00
Inked edges
Put finger prints on  playing cards with ink
Inked over saying


Thursday, August 8, 2013

Pocket Happy Birthday card


Dimensions 5.50 by 4.25
Blue card stock embossed
Blue card stock 5.25 by 4.00
Used  Accent Essentials cartridge
Cut two squares at 4.00
Made pocket out of squares
Drew stick line
Hand drew out glasses
Fussy cut out glasses
Used marker to make glasses darker
Put glasses on pocket
Cut notebook paper at 2.50 by 2.50
Stamped saying on notebook paper
Put notebook paper in pocket


Wednesday, August 7, 2013

Dad card

 
 Dimensions 5.50 by 4.25
Gray card stock cut at 5.25 by 4.00
Gray card stock embossed
Used Billionaire cartridge
Word Dad was cut at 2.50
Hat cut out of black card stock at .50 and layer same size but in blue card stock
 Two pair  of glasses  cut out of black card stock  at .50
Mustaches out of black card stock cut at .50 cut two
Tie cut out of blue card stock at .50
Hand colored black on tie
Added  three sets of eyes


Man's gift card hold and card

 Dimensions of Kraft card stock 5.50 by 4.25
Cream card stock cut at 5.50 by 4.25
De bossed  cream card stock, fold to make look like shirt cuffs, rounded corners
Drew stitch lines
Brad added to cuff front
Taped on 3 sides
Added gift card in side of cuffs
Stamped saying on brown Kraft card base

Tuesday, August 6, 2013

It's the little things

Dimensions 4.25 by 5.50
Green pattern paper cut at 2.00 by 3.75
Blue card stock cut at 3.50 by 3.75
Scored the blue card stock every .50
Punched out oval  1.50
Inked edges of oval
Stamped saying on oval
Lace
Added flower
Gemstone
Liquid Pearls down right side and on oval
Left .50 on right open to add liquid pearls to

Sunday, August 4, 2013

Christmas Tag Wallet

Christmas Tag Wallet

by Brenda Quintana


Create a wallet to hold gift tags.

Supplies

  • One 8 1/2" x 10 3/4" piece of cardstock for wallet
  • One 2 1/2" x 7 15/16" piece of cardstock for belly band
  • Scoring Tool
  • Additional cardstock and patterned paper to decorate wallet and create tags
  • Stamps
  • Ink
  • Embellishments

Step-by-Step

  1. Step 1

    For the wallet, score the 8 1/2" x 10 3/4" piece of cardstock on the short side at: 1 1/4" and 7 1/4".
  2. Step 2

    On the 10 3/4" side, score at 1/2", 3 1/2", 4" 7", 7 1/2" and 10 1/2",
  3. Step 3

    Fold along all the score lines.
  4. Step 4

    With one of the long sides towards you, find the 4 small rectangles along the closest edge and the 4 small rectangles on the furthest edge (8 total) and place 1" pieces of Scor-Tape™ on them.
  5. Step 5

    Remove the Scor-Tape™ liner from one of the long sides and fold inwards. Do the same for the other side. When you are finished you will have 6 pockets (3 top and 3 bottom).
  6. Step 6

    Decorate pockets with strips of Patterned Paper.
  7. Step 7

    When folding up the wallet make sure the thinnest scored piece gets folded to the inside first.
  8. Step 8

    For the belly band, score the 2 1/2" x 7 15/16" piece of cardstock on the long side at 1 1/4" and 4 7/8".
  9. Step 9

    Turn your project 180 Degrees (the opposite long side), score at 3 5/8" and 7 1/4".
  10. Step 10

    Fold piece in on all score lines. Put two strips of Scor-Tape on the end tab.
  11. Step 11

    Remove the Scor-Tape liner and bring together to form the belly band.
  12. Step 12

    Decorate belly band as desired.
  13. Step 13

    Make 12 tags in an assortment of colors, stamped images and embellishments.
  14. Step 14

    Place two tags in each pocket.
  15. Step 15

    Fold the wallet and slide the belly band over top to close.

Video!


 From Split coast stampers


Read more: http://www.splitcoaststampers.com/resources/tutorials/christmastagwallet