Cuttlebug 'Smoosh' Experiment
There has been so much talk just lately about
that elusive "Cuttlebug Smoosh" technique that was in a recent Technique Junkies
newsletter. Provo Craft even addressed questions about it on their blog. Since I
don't subscribe to the newsletter and have only seen samples made using this
technique, I decided to do a little bit of an experiment to see what I could
come up with on my own.
All of my experimenting was done on plain white cardstock. When inking the embossing folders I used dye ink, which easily rinses out with water.
Experiment #1:
Here is what I used...Snowflake Cuttlebug embossing folder, make-up sponge, and a VersaMagic re-inker.

After I ran my white cardstock through my Cuttlebug, I simply applied the VersaMagic ink directly to the paper with a make-up sponge. Just keep applying ink until you reach your desired color.

Here is the finished product. I added more ink to darken up some areas just to make it look more interesting.
 Conclusion: The paper from this
first one turned out very pretty, but it does not resemble the 'Smoosh'
technique.
Conclusion: The paper from this
first one turned out very pretty, but it does not resemble the 'Smoosh'
technique.
Experiment #2:
Here is what I used...A brayer, the Swirls Cuttlebug embossing folder, and a Fruitcake Kaleidacolor ink pad.

I started by brayering the ink directly onto the embossing folder. Notice that I am doing it on the side of the folder that has the Cuttlebug name printed on it. Once fully inked, I put the white cardstock in, and ran it through the Cuttlbug.

This is what it looks like when it comes out. The ink does not get down into the detail, which is what ends up raised. As you can see, it is still white.
To color what was left white I just ran my brayer over the paper directly. For this one I didn't even re-ink it, there was still plenty of ink on my brayer and I didn't want it to be darker than the background.

Conclusion: This one looks really close, to me. I have noticed in some of the samples I have seen online that they seem to be done with two colors of ink. This particular way would allow for that because you could ink your embossing folder with one color, then brayer over the top with a different color. That could be very pretty!
Possible Option: Instead of brayering the ink onto the embossing folder, you could try to sponge the ink on and try to get it down into all of the grooves. Sponging the ink will probably take longer though, and your coverage is more likely to be uneven.
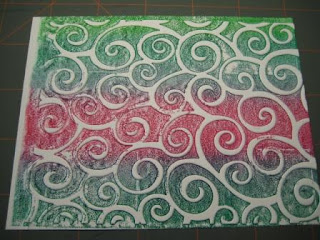
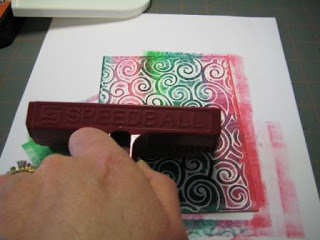
Experiment #3: I used the same supplies for this one as I did in #2. The Swirls Cuttlebug embossing folder, a brayer, and a Fruitcake Kaleidacolor ink pad.
For this one I ran my white cardstock through the Cuttlebug.

Instead of inking the embossing folder, I used my brayer and went over the cardstock after it was embossed. To hit the raised pattern and the background, you really have to push down. Use two hands if you have to, that is what I did.
When you are done, your cardstock will look like this. Notice the white areas. Because the paper was already embossed your brayer will not touch all of the background leaving those white lines around the detail, which I think is a really neat effect.
 Conclusion: This one looks really
good too. The result is definitely much darker since you are repeatedly going
over the paper. One nice thing about this method is that there is a little less
clean-up, since you don't ink the embossing folder. Plus, you don't have to
worry about staining your folder if that is a possible
concern.
Conclusion: This one looks really
good too. The result is definitely much darker since you are repeatedly going
over the paper. One nice thing about this method is that there is a little less
clean-up, since you don't ink the embossing folder. Plus, you don't have to
worry about staining your folder if that is a possible
concern.
In the end: The last two methods that I tried are definitely the closest. Are either of them completely right? I have no idea, but they have to be awfully close. The important thing though, is that I had a lot of fun playing and even if it isn't exact, I have 3 new ways to make interesting and beautiful backgrounds!
From Stampalicious.com
All of my experimenting was done on plain white cardstock. When inking the embossing folders I used dye ink, which easily rinses out with water.
Experiment #1:
Here is what I used...Snowflake Cuttlebug embossing folder, make-up sponge, and a VersaMagic re-inker.

After I ran my white cardstock through my Cuttlebug, I simply applied the VersaMagic ink directly to the paper with a make-up sponge. Just keep applying ink until you reach your desired color.

Here is the finished product. I added more ink to darken up some areas just to make it look more interesting.
 Conclusion: The paper from this
first one turned out very pretty, but it does not resemble the 'Smoosh'
technique.
Conclusion: The paper from this
first one turned out very pretty, but it does not resemble the 'Smoosh'
technique.Experiment #2:
Here is what I used...A brayer, the Swirls Cuttlebug embossing folder, and a Fruitcake Kaleidacolor ink pad.

I started by brayering the ink directly onto the embossing folder. Notice that I am doing it on the side of the folder that has the Cuttlebug name printed on it. Once fully inked, I put the white cardstock in, and ran it through the Cuttlbug.

This is what it looks like when it comes out. The ink does not get down into the detail, which is what ends up raised. As you can see, it is still white.

To color what was left white I just ran my brayer over the paper directly. For this one I didn't even re-ink it, there was still plenty of ink on my brayer and I didn't want it to be darker than the background.

Conclusion: This one looks really close, to me. I have noticed in some of the samples I have seen online that they seem to be done with two colors of ink. This particular way would allow for that because you could ink your embossing folder with one color, then brayer over the top with a different color. That could be very pretty!
Possible Option: Instead of brayering the ink onto the embossing folder, you could try to sponge the ink on and try to get it down into all of the grooves. Sponging the ink will probably take longer though, and your coverage is more likely to be uneven.
Experiment #3: I used the same supplies for this one as I did in #2. The Swirls Cuttlebug embossing folder, a brayer, and a Fruitcake Kaleidacolor ink pad.
For this one I ran my white cardstock through the Cuttlebug.

Instead of inking the embossing folder, I used my brayer and went over the cardstock after it was embossed. To hit the raised pattern and the background, you really have to push down. Use two hands if you have to, that is what I did.

When you are done, your cardstock will look like this. Notice the white areas. Because the paper was already embossed your brayer will not touch all of the background leaving those white lines around the detail, which I think is a really neat effect.
 Conclusion: This one looks really
good too. The result is definitely much darker since you are repeatedly going
over the paper. One nice thing about this method is that there is a little less
clean-up, since you don't ink the embossing folder. Plus, you don't have to
worry about staining your folder if that is a possible
concern.
Conclusion: This one looks really
good too. The result is definitely much darker since you are repeatedly going
over the paper. One nice thing about this method is that there is a little less
clean-up, since you don't ink the embossing folder. Plus, you don't have to
worry about staining your folder if that is a possible
concern.In the end: The last two methods that I tried are definitely the closest. Are either of them completely right? I have no idea, but they have to be awfully close. The important thing though, is that I had a lot of fun playing and even if it isn't exact, I have 3 new ways to make interesting and beautiful backgrounds!
From Stampalicious.com
No comments:
Post a Comment