1. First download the free paper bow printable template HERE. 2. Print the template on the back side of your patterned paper and cut along the dashed lines.
3. Add adhesive to the center of the bow and fold one of the ends over to the center without creasing the fold. Repeat for the other end.
4. Add adhesive to the center section and fold it over the middle of the bow.
5. Add foam squares to the base of the bow and place the bow on top of the base.
Paper bows are great focal accents for cards, scrapbook pages, and other paper craft projects. (From scrapbook$cards today blog.com)
We love this great woven paper project from Lisa Storms in our August 2012 issue. It’s amazing the techniques you can do with just paper. Here are the step-by-steps for making this easy project.
Step 1: Adhere white and blue strips perpendicular onto second white strips.
Step 2: Adhere second blue strip perpendicular onto perviously adhered strips, as shown.
Step 3: Fold right white strip over to left side, being sure to line up with the left strips.
Step 4: Repeat with the left white strip over to the right side.
Step 5: Continue with next color; repeat, always making sure to keep your strips lined up
Joy fold cards are basically two cards rolled into one. You can get some really great results using a variety of contrasting papers on the different panels of the card and you can also experiment with shape, size and fold placement for unique looks.
Requirements:
White card stock 41/4" x 10"
White card stock 3" x 8"
Patterned paper 4" x 33/4"
Patterned paper 4" x 53/4"
Patterned paper 33/4" x 23/4"
Choice of embellishments
1. Start with the 41/4" x 10" piece of cardstock. Measure 6" from one of the short sides, score and fold. You should now have a folded card that has a back measuring 41/4" x 6" and a front measuring 41/4" x 4".
2. Fold the 3" x 8" piece of card stock in half to make a folded card measuring 3" x 4".
3. Adhere the 4" x 53/4" patterned paper to the inside of the larger card leaving a small border as shown in the picture below.
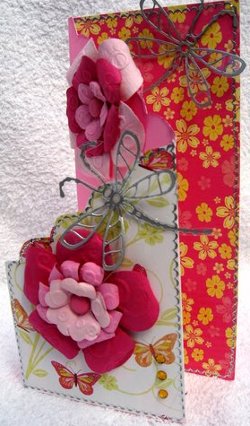
Cris cross cards get their name from the two panels that cross over the front of the card. You'll get different looks depending on your measurements and how you cut and fold the panels, but once you have the basic idea you can easily experiment by altering sizes, shapes and folds.
1. Start with a piece of card stock measuring 5" x 12".
2. Score at 31/2" and again at 81/2".
3. Fold along the score lines pressing firmly to achieve nice, sharp folds.
4. Cut away some of the outside panels using a craft knife or trimmer. The measurement and shape of the cut is up to you and the outcome you are trying to achieve. I cut mine from the top of the fold to 11/2" up from the bottom of the card.
5. Now that you have the basic card you can add some patterned paper and embellishments. I added a 43/4" square of patterned paper to the inside of the card, then cut smaller pieces to fit the panels, inside and out.
6. I used a border punch and some matching card stock to add a trim around the top edges of the card.
7. I added a piece of ribbon all the way around the outside of the card, securing it with double sided tape except in the section where I wanted to add a bow.
8. Your focal image or sentiment can be added to the top front panel of the card. It only needs to be secured on one side. Alternatively, you can create a decorative band that slips over the card and holds it closed.
9. I added a bow on the left side of the second panel, which tucks over the top of the focal image effectively holding the card closed. Easy!
All instructions and images are copyright Beccy Muir 2012.


 This little tutorial is here to help you get the results you want and there are many ways to decorate this card once you have the basic shape.
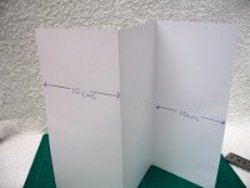


 If you want a different look to your cards then make a swirly cut instead and see what a difference that makes.
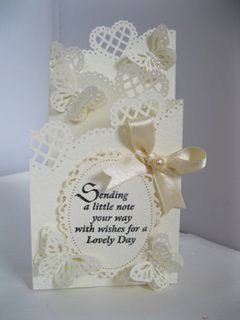 Maybe you would prefer to decorate the top with your punches for another look.


